
Even though there isn't a child in my future any time soon, I enjoy looking at all the cute baby stuff out there on Pinterest and one day I will be able to put all this inspiration to use! But for now- I get to make baby gifts!!
My cousin's son just turned one about a month ago. I went looking for a fun toy for his birthday gift. All I could find were toys that made an awful lot of noise or toys made for 3+ year olds. So I decided to make something.
 | ||
| via |
that has all sorts of cute baby gift ideas! I thought this was adorable and DIY-able. So I got to work.

Update: I have had quite a few questions on how to create this birth announcement. I have tried my best to simply explain the process! Open Microsoft Word and go to the insert tab. Insert- Picture- Word Art. Type in the text you would like for the first line. To stretch it to be taller and wider, just click on the word, click and hold one of the black corner squares and then drag to the right until it is the size you want. On the second line with the middle and last name, do the same thing as above but just insert a separate word art for each but on the same line. The dotted line is just a row of periods stretched and made short to fit across the page. The next few lines are the same as the first. Just insert and then stretch to make it the size you would like. You can copy and paste the dotted line. The bottom line with the date and time- same as the middle and last name line with separate word art on the same line. To stack the city and state, type in the city and then hit enter and then type the state to stack below. Then insert. To change the color- click on the word art. In the word art tool bar, click the paint bucket and brush. The choose your color from the drop down menu for both the fill color and line color.
Thanks to Marcella, she has explained how to create this word art in more recent versions of Word: Go to Insert > Word Art > Choose a Color of font > Under the "Text Effects" Drop Down, Choose "Transform" and then choose the first item under "Warp." This will allow you to stretch the words as you wish. From there you can alter the text any way you wish.
Sorry I do not have a template available for download!
Like I said earlier, we have quite a few friends that are having little ones soon! I found the most adorable pacifiers and bibs that I thought would make great gifts for Baby McKenzie and Baby Kirksey!
 |
| via Pinterest |
 |
| via Pinterest |
So first step-


I then added a little hot glue to the top middle of the pacifier and centered the mustache in place.

I absolutely L.O.V.E these! I will be making these again for many baby gifts to come! They were SO EASY!
For the bibs I bought a pack from Target and three (1/4 yards) of fabric and iron on backing from Hobby Lobby. I found a picture of a tie and a bow tie on the internet and printed them off to the size that I needed.


This stuff is easy to use. There is a dull side and a side that has shiny dots of "glue" (there might be a fancier sewing name for this but for now, I will just call it glue). Put the wrong side (back side) of the fabric to the shiny side of the backing. That way when you iron the "glue" will stick to the back of the fabric. The "glue" can stick to the iron if you don't have a fabric on top so that is why I cut out rectangles at first. I would be hard to iron the ties and bow ties down and not touch the backing. (NOTE: I just learned last night about Wonder Under- I think this would be a better option and can't wait to try it out!)
I then cut out the ties (I would suggest going over the ties again with the iron to make sure all the edges are really stuck together. Mine came up a little when I was sewing).
I placed the ties and bow ties on the bibs and pinned them down.

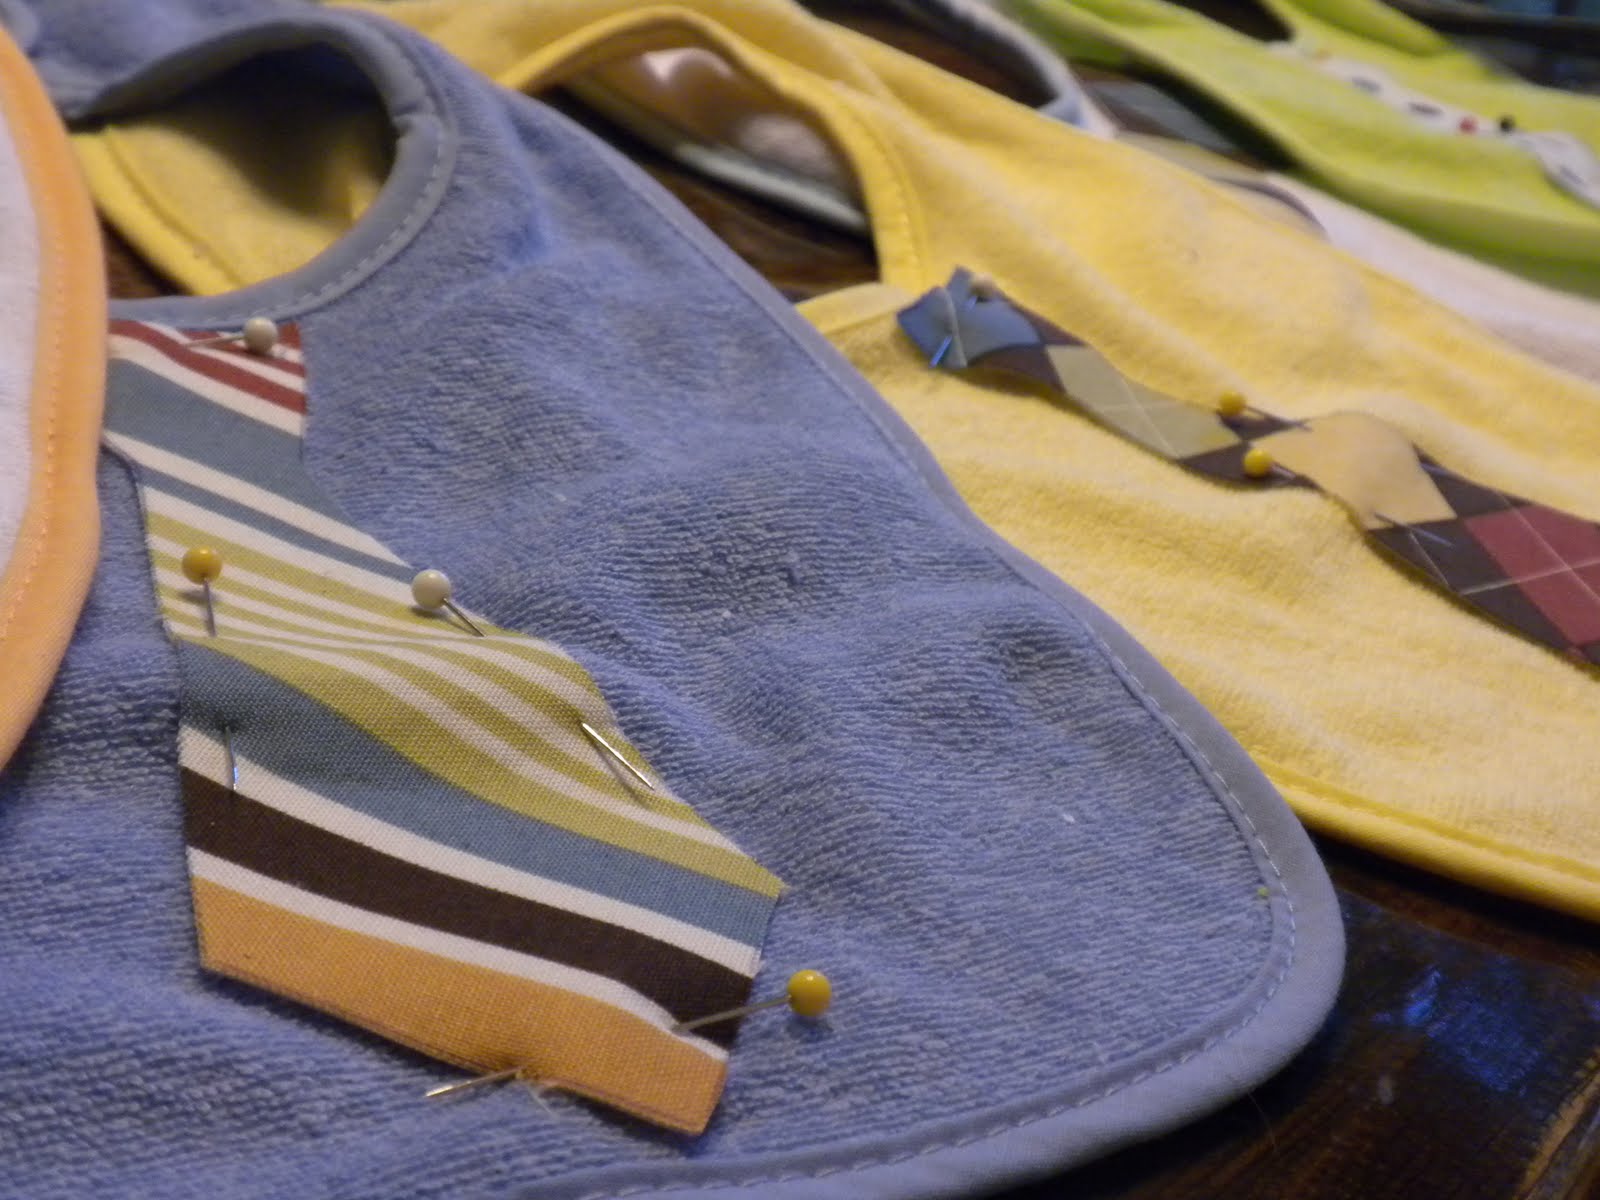
And then I started sewing.

I know it might have had something to do with the sew-ee but my machine gave me fits on a couple of bibs.It worked perfect on some and then went bizerk on others- for no reason at all. It may have been the fact that it was "vintage".

In the end I love the cute bibs and pacifiers I made! I think Baby McKenzie and Baby Kirksey will be some of the most sophisticated new kids on the block!!

P.S- The bibs and pacifier were a hit last night at the shower! I already have orders to make more!! I'm so excited!
Shabby Nest: Frugal Friday
*Remodelaholic*: anonymous 81
At the Picket Fence: Inspiration Friday
Tip Junkie: Tip Me Tuesday
Cute! I sew on a 'vintage' machine too - an ancient Kenmore from the 70s - and it also gives me fits when I sew a zigzag stitch!
ReplyDeleteFound your blog thru the remodelaholic link party.
Allie @ ducklyandjuicy.blogspot.com
I LOVE all of it! I've seen the art on Pinterest but hadn't thought to make it in Word. I'm about to make Carder one now! Loving your blog! :)
ReplyDeleteWhat font did you use on the art?
ReplyDeleteI did it here at my office so I just had the boring "law like" fonts. I used "CG Omega" but I just played with it until I found a block one that I liked.
ReplyDeleteI LOVE the bibs you made, is it possible to order one from you along with a mustache pacifier??? Please email me at barrettklein@gmail.com
ReplyDeleteThanks!
Barrett
These are Amazing! I was just wondering if you ironed the tie on the onesie and THEN pinned it down to get ready for the sewing?
ReplyDeleteFabulous Fonua's- for these I did not. I used a backing that was only iron-on on the one side that faced the ties which meant I had to pin the ties to hold them in place. I have made some more using "Wonder Under" which has an adhesive on both sides of the backing. I did iron the ties to the bib using that and only sewed along the edges for the "design" and a little extra hold. I did not pin though using the Wonder Under. I hope this is what you might have been looking for!
ReplyDeleteFound the bib tutorial through pinterest and gave it go! Loved it! And then gave them as a gift to a friend this past weekend. Thanks for sharing the tutorial... my bibs turned out great! http://laurablogsagain.blogspot.com/2012/03/handmade-gifts.html
ReplyDeleteTara here from Mosie Posies - thanks for the shoutout and nice crafting! There's lots more designs that I have in my shop, you can find them all here: www.mosieposies.etsy.com for all you non crafters out there.
ReplyDeleteHey Laura, I found you on Pinterest. Love the signs and bibs--so cute! Anyway, I was trying to see if you have a facebook page for your blog but found your personal page instead and accidentally requested to be your friend. Hope you don't think it's totally creepy, but I really liked your blog. =)
ReplyDeleteAngie Kay
Hey Laura, I found this post through Pinterest when I was looking for art for my son's nursery. I finished mine today, can't wait to get it up in the nursery!
ReplyDeleteHi! I discovered your blog thru Pinterest and I noticed that you've done the poster by your self in Word...I tried to do this for a while now but I'm not very good with it. I can't find a way to write the first name like you've done. Would you accept to share your template or to help me with mine?
ReplyDeleteThanks! Melanie from Quebec, Canada
I just tried this my slef. you use the wordart but you have to make the letters larger. It took me alomost 30 minutes to get it right.
DeleteThat is the exact same kind of sewing machine my mom had when I was growing up! It's the one I learned on. Love the tie bibs and the mustache pacifiers. Too cute!
ReplyDeleteWhat were the font sizes for each item? Thanks for sharing!
ReplyDeleteBecause I used Word Art there really aren't font sizes. I inserted the Word Art and stretched each box to fit the height and width that I needed. Sorry I couldn't be of any help!
ReplyDeletewhat kind of paper did you use to print them?
ReplyDeleteDanielle- I simply printed on copy paper. Cardstock would also be great but I just used what I had!
DeleteSo I just tried the template that you gave us. I think it cam out okay.
ReplyDeleteThese are adorable!! Great, unique ideas. I was wondering though, why do you use the iron-on backing?
ReplyDeleteI use the iron on backing just to give the tie fabric a little weight and strength before sewing. It is just a thin cotton fabric. BUT if you use Wonder Under it has an adhesive on both sides. You can iron it to the bib to make it easier to sew in place and you don't have to worry with the pins.
DeleteCool! Thanks!I'm going to try it tonight.
DeleteThe birth announcement is so cute. Not sure what version of Microsoft Word you are using, but 2010 doesn't seem to work that way. Wish I could figure it out because I would love to make these.
ReplyDelete2010, had the options for word art, it's under insert.. Its to the left past the text box (in the text category listed on the bottom) Word art is not set up like regular font you drag the corners out to make it the size you want, it had style options colors etc...
DeleteCan you share your Word Template as download or send it email?
ReplyDeleteIn Word 2010, the entire word does not stretch or get larger when you pull the corners, as you describe. Do you have a template available that you can post?
ReplyDeletei WOULD LOVE THE TEMPLATE AS WELL.
ReplyDeleteThis comment has been removed by the author.
ReplyDeleteI'm sorry! I have tried my best to describe how I created the word art. I have an older version of Word but as any of these word art projects are, you just have to play around with it until you get to something you like. I do not have a template. Sorry again!!
ReplyDeleteThank you for the tip for the birth announcements!! I am playing around with it right now and cant wait to finish it. It's looking great! :)
ReplyDeleteFor those of you with Word 2010, the way you get the text to stretch to the size of the box is by following these steps: 1) Select the text box. This should open the "Drawing tools/Format" menu. 2) In the "WordArtStyles" box of tools, you'll see a little blue "A" with a down arrow next to it. Click the down arrow and you should get a menu that includes "Transform" at the bottom of the list. 3) Select "Transform". 4) Under the "Warp" section, select the first option which when highlighted says "Square". Hope this helps! It took several internet searches for me to figure this one out!
ReplyDeleteHi,
ReplyDeleteI can't find the template. Can anyone help.
Thank you.
Made one of these today! :) Love it!! Thanks so much for teaching me how to use Word Art. Took some playing around but I love what I've made.
ReplyDeleteAnyone know how I could do this on a Mac??
ReplyDeleteHello I actually just made one similar to this yesterday on a Mac. I have a MacBook and an older version of word. Go to the View tab - click toolbars - click on Wordart - choose which design you like - change the font & color - then stretch the corners to fit your page. Hope this helps :-)
DeleteI was so happy to find this on pinterest. Played around on word with your instructions and now have my finished masterpieces. Thanks!!!
ReplyDeleteLUV YOUR BIBS!!!!they look so much better than the sight you saw them on...great job:-)
DeleteHi, I'm sorry if this has already been asked but i was wondering what font you used for the signs? I'm in the process of trying to make ones for my 2 sons. Thanks a buch :-)
ReplyDeleteanyone have suggestions for how to make the sign with open office? i don't have word on my computers at home. :(
ReplyDeleteIronic I just made an announcement similar to this yesterday. I also used Microsoft Wordart on a Mac. I think I have Subway Art fever now - I Love your designs!!
ReplyDeleteadayinthelifewithtj.blogspot.com
Hi there. What font did you use for the lovely birth announcement? I am making one right now (thank you so much for Marcella's explanation of how to do it in a modern word program, it worked perfectly by the way) and the font I am using is more curvy. I like the straighter font you used. Thanks so much.
ReplyDelete~Jenn
Hi Jenn! I used "CG Omega". It is just a basic block font that came on the computer.
DeleteOh these bibs are so cute - I wanted to try this concept with the inner part of a real tie. I made a project and used one part of the tie and thought I could applique it to a T-shirt. The project is on my blog.
ReplyDeleteI wish people weren't promoting this on Pinterest as a template since there is no template to download here.
ReplyDeleteI agree. It is NOT a template if you can use it. It is an idea.
DeleteGreat idea! thanks for the idea & mosieposie for the inspiration..
ReplyDeletewas feelin terrible I couldnt remember my 6 year olds birth time
For the birth announcement, what size did you all print out? I would like to make mine smaller than the 8 1/2 by 11 inches, but everytime I try to crop it, some of the letters disappear. Any suggestions?
ReplyDeleteThank you for the subway name art! I did one for both my girls and love it! I also saw this on Etsy but didn't want to pay for it. Thanks again!
ReplyDeleteI made a pack of tie and bow tie bibs for my friends shower last week. I posted about it and linked it to your blog.
ReplyDeletePlease take a look and thanks for the idea!
http://seegirlsew.blogspot.com/2013/07/made-it-monday-little-boy-bibs.html
Elise
seegirlsew.blogspot.com
SeeGirlSew is now on Facebook!
I pinned this ages ago and finally took the time to carry it out for my 2 children. Going to get my frames tomorrow to get them on the wall with a couple of other kiddie items. Thank you so much for sharing the idea! (Oh and by the way, I used the font Weston which was a free download and did them in Power Point instead of Word in case anyone is interested).
ReplyDelete