Showing posts with label Word Art. Show all posts

Monday, October 22, 2012

{31 Days} Family Tree


Note:  Due to some unforeseen family illnesses, I am having to play catch-up on my 31 days challenge! Thank you for reading!

Day 10: Family Tree


For each of my grandmothers' birthdays this year, I created a sweet family tree. I found this cute idea on Pinterest and decided I could recreate it using Microsoft Word like I have on other word art projects here and here. By downloading a new font and playing around with word art, I was able to create three different trees with each of my grandmothers' kids and grand kids. They all loved this sentimental gift!!


Word art makes such a simple and sweet gift.

10 down! 21 to go!!


Thursday, February 23, 2012

Love Never Fails Word Art

I am back at a little DIY-ing this week while trying to finish up some projects in my master bedroom. My first project was more "word art". I know.... more word art! There is something about having sentimental or inspiring quotes or lyrics around your house to inspire or remind you of a special day that keep me making more (plus it is inexpensive)!

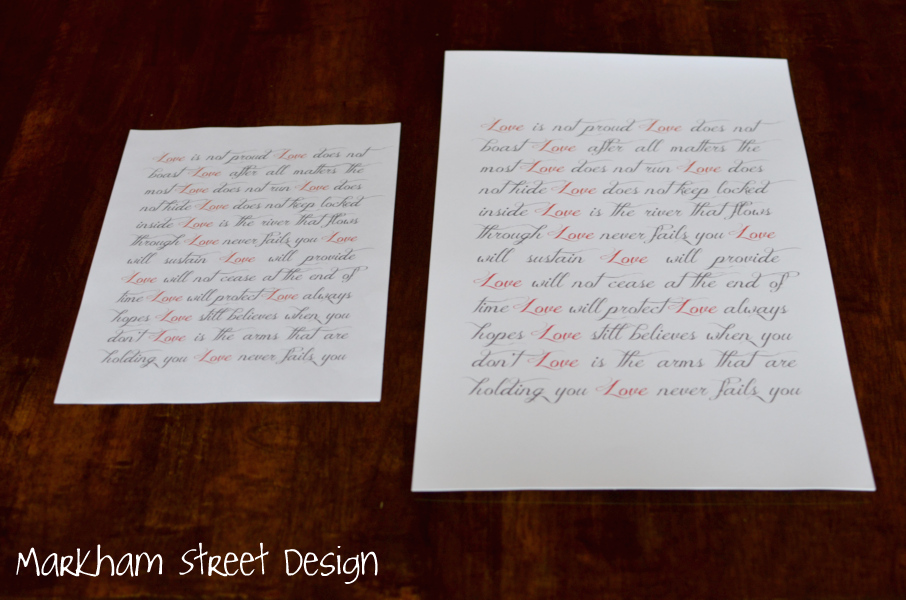
These words are the lyrics to the song we had sung at our wedding- "Love Never Fails" by Brandon Heath. It is a beautiful song!

I started with these frames that I picked up at my local thrift shop. I paid only $6.00 for each one and knew from the start what I wanted to do with them (just took me about 6 months to get around to it).

I loved all of the detail and color in the frames. The gold ties in well with a few of the other gold accents in my bedroom and the coral color (although it is reading as red in these pictures) look great with my coral euro shams.

I typed up the lyrics again in Microsoft Word and chose a pretty font on my computer. I chose a charcoal gray as the font color and then made the word "love" coral to match the colors in the frame. I then had my 8.5" x 11" sheet enlarged at a print shop in town to fit the size of the opening in the frame.- this cost me only about $1 per page!


Since it was an odd size, it was printed on an 11" x 17" paper. I trimmed off the extra paper to make it the size I needed to fit in the frame.

I then popped the art in the frame and smiled because I finally finished this simple project!

Such a great reminder of the best day of our lives! They are hanging over my nightstand for now! As soon as I finish up a few more projects, I'll reveal the room I have been working on for months! haha!

What is your favorite way to remember great quotes or lyrics? Do you have them all over your house like me? I am planning some actual "art" pieces soon!!


Linking Up with 320*Sycamore- Under $10 and Under 10 Minutes

Thursday, November 3, 2011

Simple Word Art

I have been pinning a ton of graphic art and prints lately. Ones that I think would look great in my home or even some that could be personalized for a fun gift at Christmas or a wedding. I got to thinking how easy it really is to create your own printable word art through a simple program on your own computer. I am by no means a graphic artist! (I wish I was)! I have dabbled in Photoshop but I don't know enough about it to make a piece of art. One program I do know how to use (and don't laugh at me) is Microsoft Word! Haha! Ok- I had to laugh at myself! I told you I was no graphic artist! But it is simple!!! Here are a couple of pieces I pinned thinking they would be a great wedding present!
via
via
The first step is to find fonts you like and install them on your computer.  There are hundreds of free fonts available online if you simply search for them at sites like Dafont and Kevin and Amanda and many, many more. If you have a PC  here are some simple instructions on how to install your new fonts. Once you’ve installed your fonts you can get to work creating your own word art!

To start- open up a new Word document and 'Insert' Word Art. I chose a font I liked and then typed in the first line of text. I then adjusted the height and length to fit the page. After that, I just copied and pasted that one line- editing the text and only the height as I went.
I changed the one line with my husband and my name to be a reddish color. The rest are all the same gray.


And I made sure the dimensions of the word art would print out the size of an 8" x 10" picture.

For the other Graphic Art- I basically did the same thing.

This time I changed up the font and color on each line. I printed this one to be a 5" x 7"
After I printed them off, I placed them in simple frames with white mattes. I thought they turned out pretty good for a Mircosoft Word piece of art!
What fun artsy things have you done on your computer? Do you have more skills when it comes to the actually programs made to do these kinds of things? Any tips on how to make graphic art on other programs such as photoshop?


Linking up to The Shabby Nest , Young House LoveBower Power 
Chic on a Shoestring
Related Posts Plugin for WordPress, Blogger...
09 10 11 12
Blogging tips